
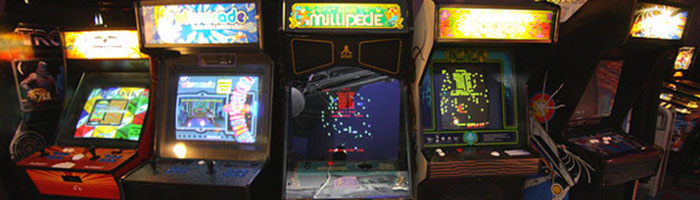
I saw a MAME cabinet on eBay a few months and I very nearly bought it. I could have saved myself a lot of time and effort there, instead of attempting to build one myself. But it was still quite expensive and I wouldn’t have had the same satisfaction that I know I’m going to get after building my own cabinet. Plus I’m quite picky over how the cabinet will look, and I don’t really like all the MAME cabinets that you see out there. Some people often try to cram too many controls or gadgets into their machines or make them too boxy etc. I’m not saying mine is going to be an amazing thing of beauty but I wanted to put some thought into exactly what style and design I wanted.
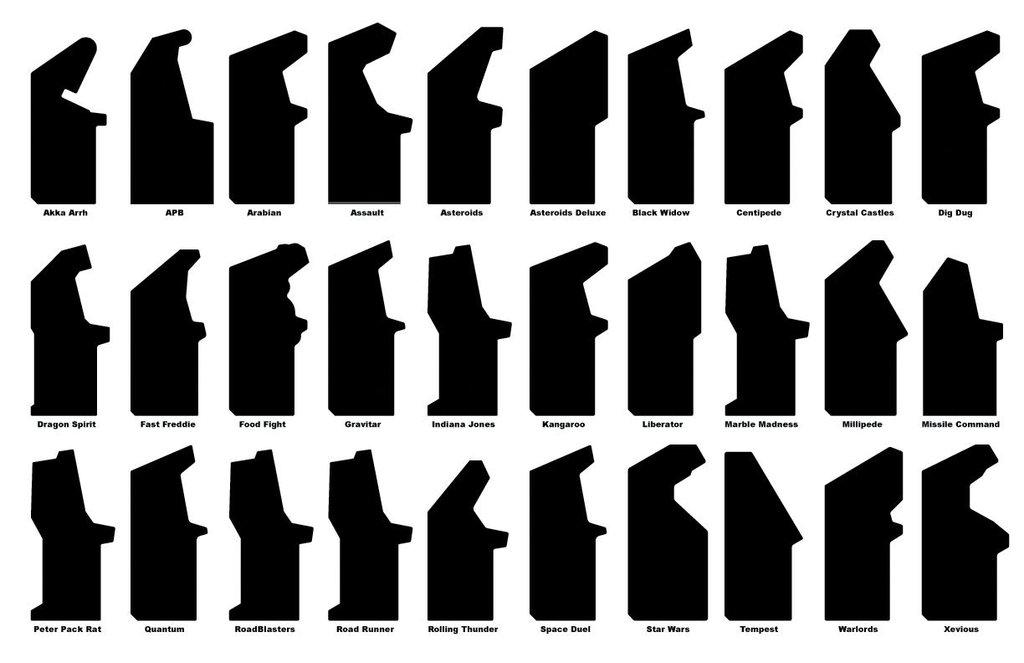
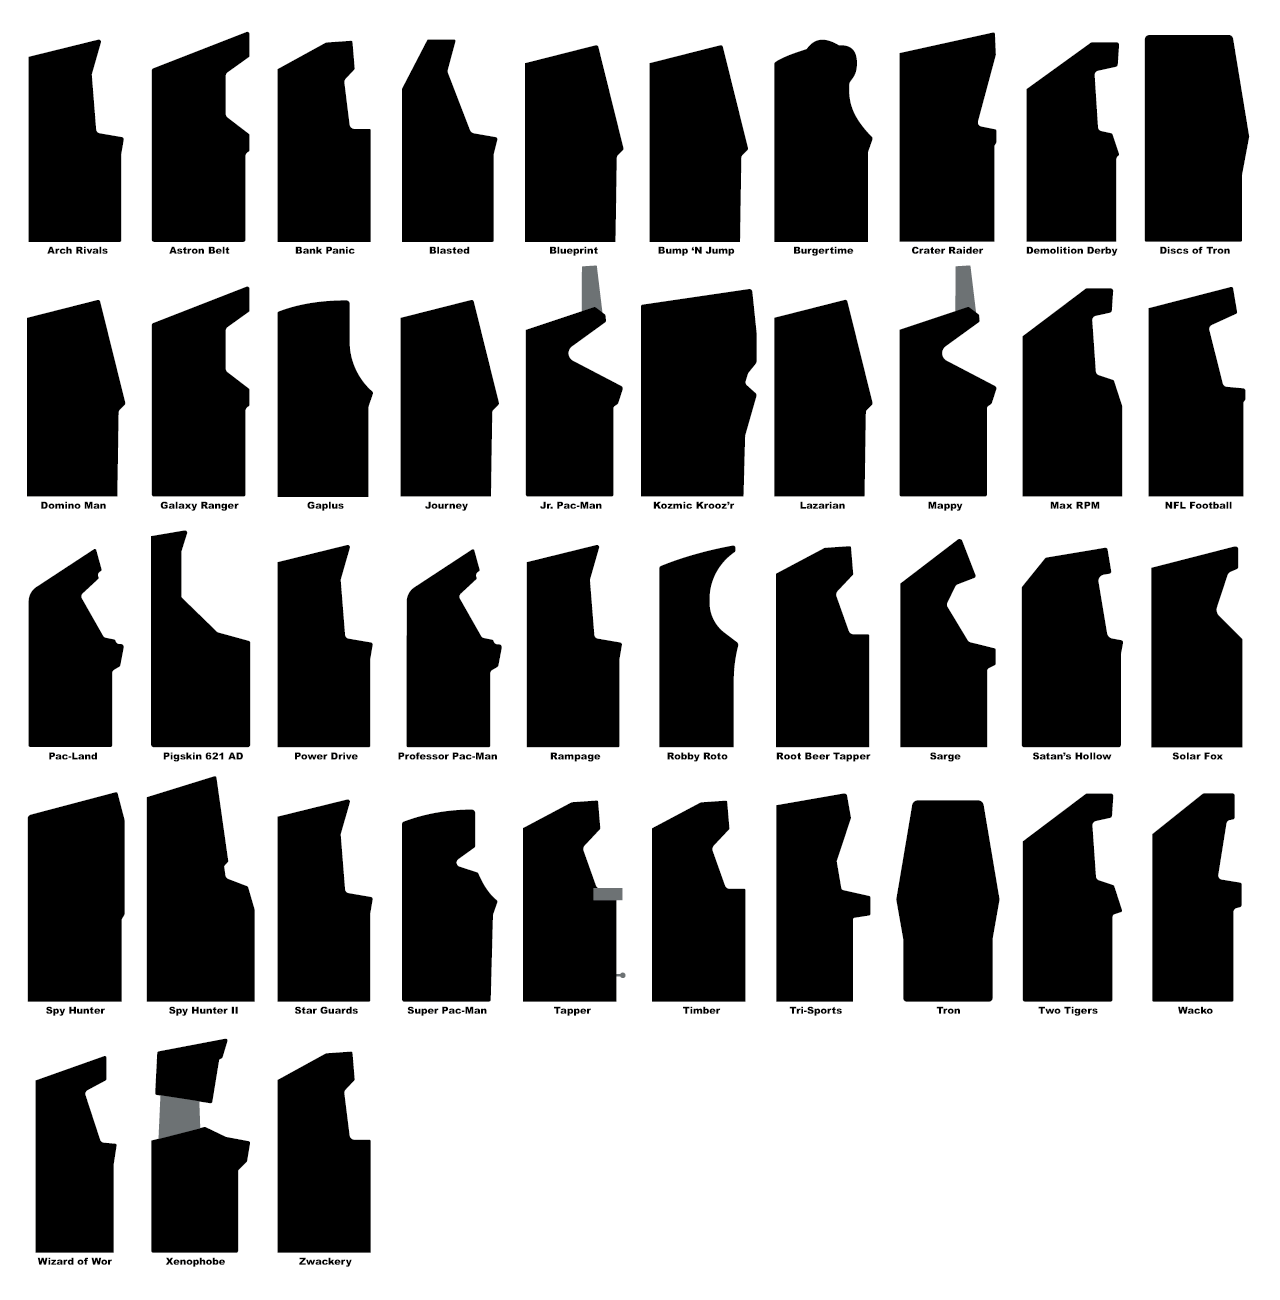
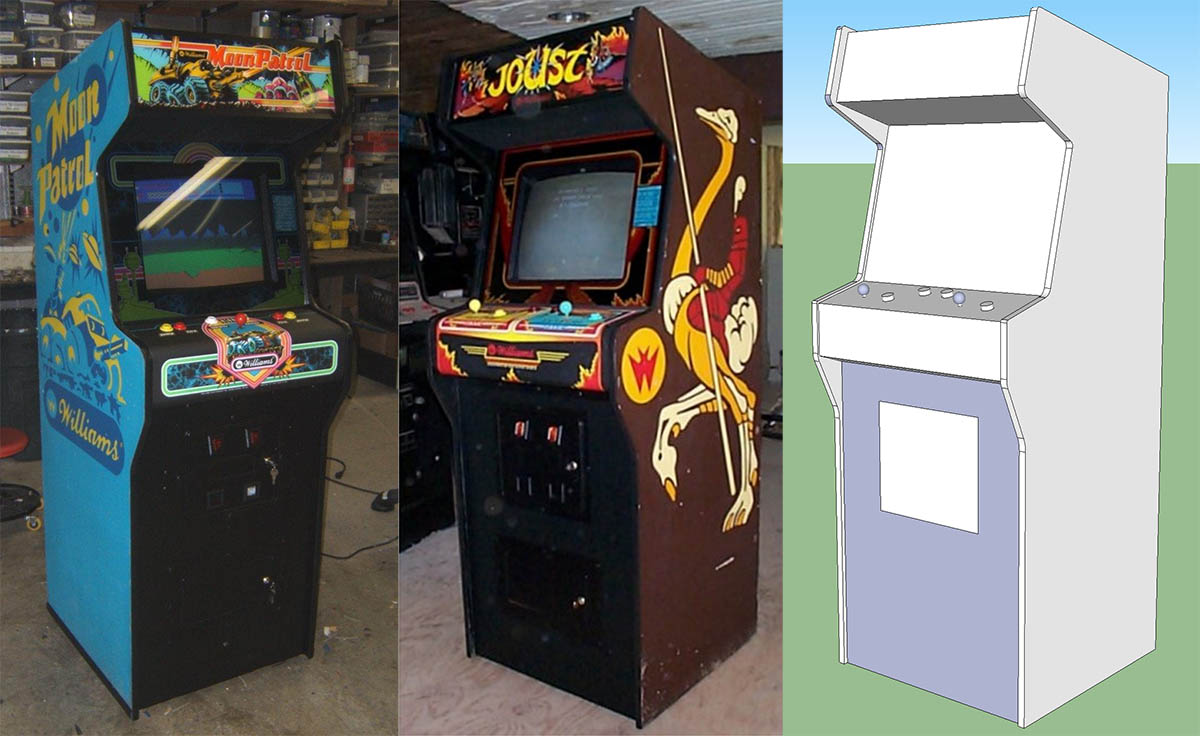
I’d been wondering what old cabinet style I would like to replicate. I came across these fantastic silhouettes of arcade cabinets which really show the amount of variety between different games and different manufacturers.
Atari cabinets
Bally Midway cabinets
Williams cabinets
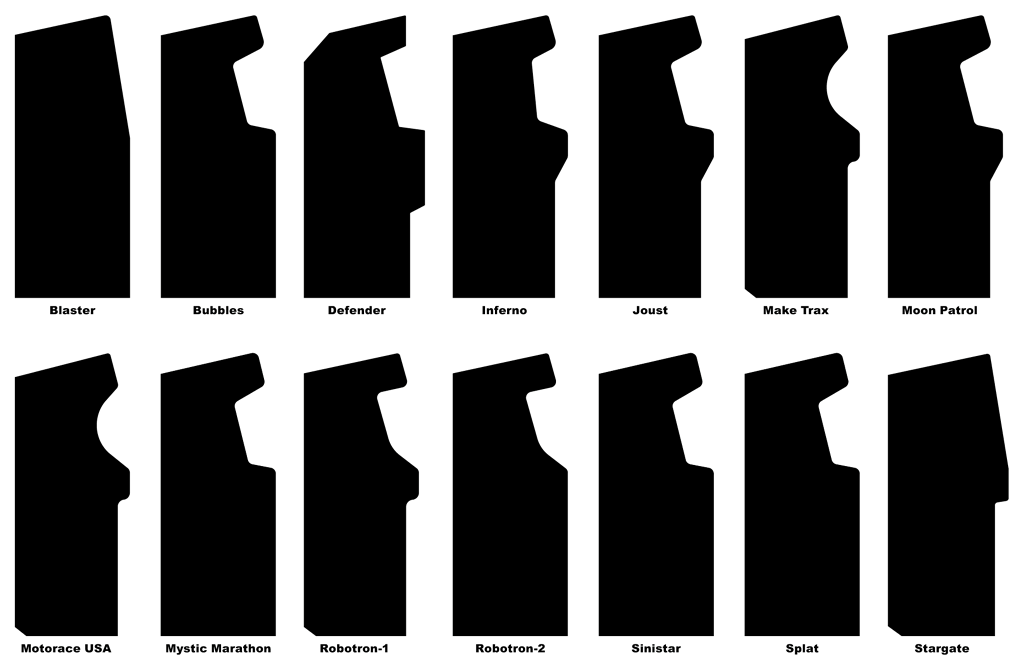
There’s also the Nintendo cabinets with their own unique style. I do think the Nintendo arcade cabinets have a certain charm but that wasn’t the style I wanted to replicate personally, and the Midway ones didn’t really tickle my fancy. The Williams ones are awesome though and really evoke that classic 80s arcade style to me. The ones that jumped out to me are Joust and Moon Patrol. Robotron is nice too. Joust and Moon Patrol are supposedly almost identical with only about an inch or two difference in the width I believe. I preferred these two and because Joust is the more famous of the games I’ve decided that I’m going to base my design on the Joust cab. I was hoping to go up to the amazing Arcade Club UK a couple of months ago to see one in the flesh and measure but we had to cancel. What I’m now planning on doing is using the silhouette and some simple maths to work out all the dimensions and angles myself. I just need one measurement to get me started, such as the overall height, from which I can then work out the rest, but I’m hoping I can get that from some kind person on an arcade forum.
So that’s what I want the shape to be, but the next step is to think about how I want to decorate the machine. This is the bit I love, but also the bit I could seriously spend months on trying to perfect. A lot of my Retromash branding involves the off-white/cream which was used a lot in the 80s in things like the NES, SNES, GameBoy, Raleigh Vektar and the Tomytronic 3D Thundering Turbos to name but a few. It’s just a colour that I associate with 80s gadgets. So I’m thinking I will have that as my base colour and make it a light coloured arcade machine, which is a bit different. I’ll obviously have the Retromash logo or a variation of it in the marquee up top but I’m not sure yet what to have in the bezel around the monitor. Probably just some cool line patterns or maybe a list of names of some of the popular games I’ll have on the cabinet. Not sure. I might just keep the bezel minimalist and black.
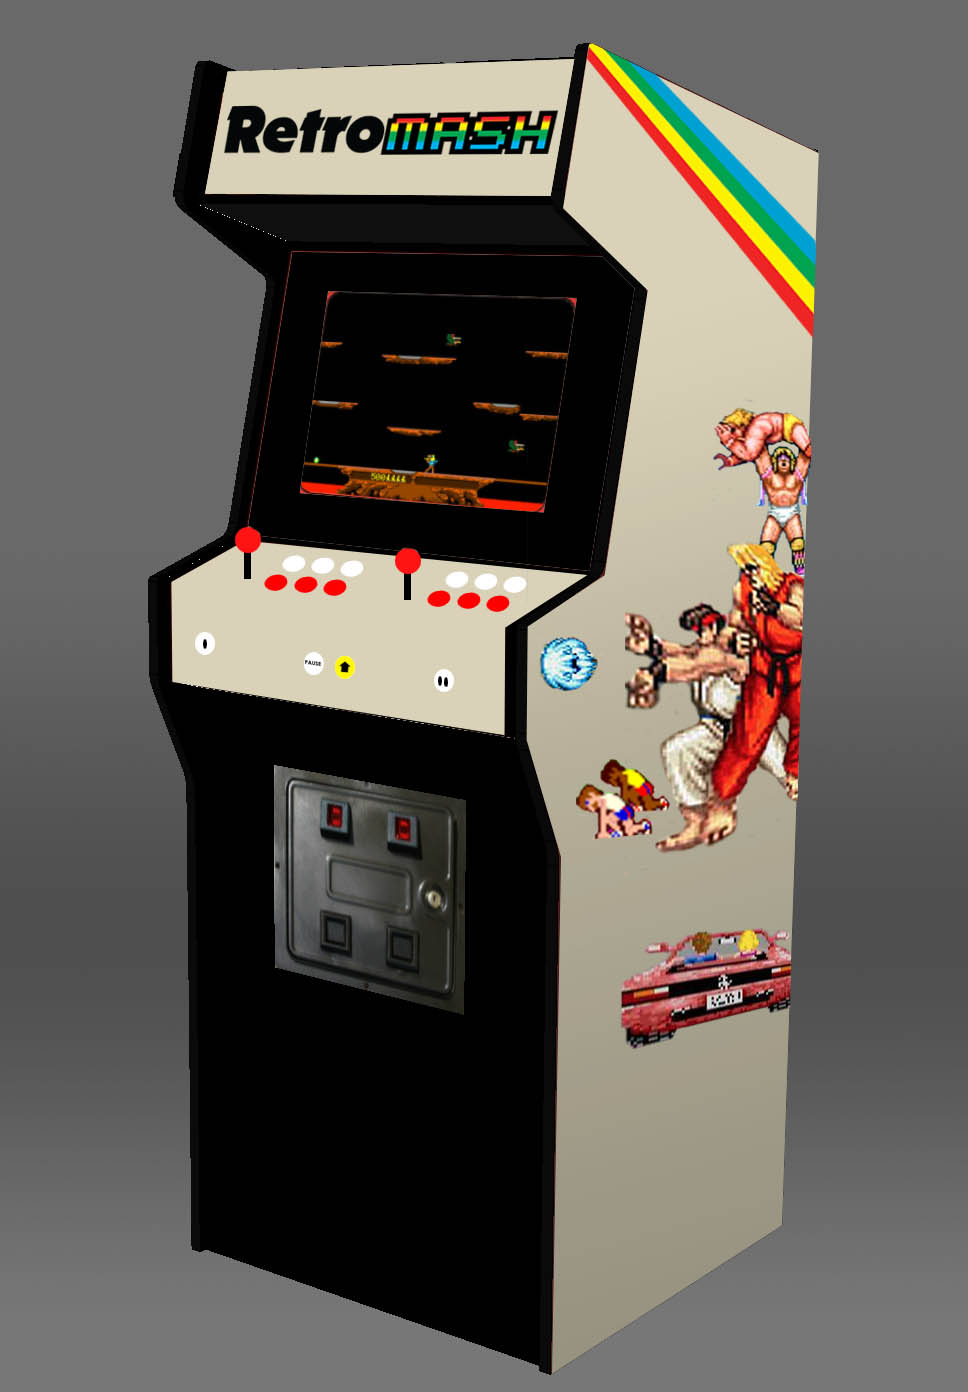 And for the all-important side art I’m thinking I might try to put together a collage of video game characters and graphics that appear in some of my favourite arcade games. Some might be in-game sprites and some might be other art such as box art graphics that I can recreate in vector format. I’ll probably keep it to in-game sprite art actually. Might be easier. Some games or graphics I would have would include Donkey Kong, Space Invaders, Pac-Man, Street Fighter II, Bubble Bobble, Operation Wolf, Out Run, Star Wars, Gauntlet, Tekken, Rampage, Golden Axe, Track n Field, Galaga, Double Dragon and WWF Superstars. I’m aware it could look quite tacky if done wrong so I’m going to try to do it right and have them all as high res/vector graphics and using a similar colour palette etc. We’ll see how I get on with it. I may change my plan halfway through.
I also mulled over the buttons colours for ages when ordering my joysticks and buttons this week. I’ve settled on a combination of red and white for the main 6 buttons each and also white for the player and insert coin buttons on the front. I thought I’d keep things simple. The main ‘home’ button on the front will be either yellow or red. I’ll discuss my button choice in a separate post.
You can see a very, very rough mockup of what my final machine might kind of look like on the right here. The side art is obviously just a very early rough mockup and will have many more graphics than that. Looking forward to creating that art. The marquee will probably be lighter than this mockup too and also I will want to have some graphics on the control panel layout too. Not sure what yet. Might not have those stripes on the side either. Ooh, I really could spend ages designing the artwork for this. Bring it on.
Download all the files containing my cabinet design and measurements etc here (mix of PDFs, Illustrator files and Sketchup files). UPDATE: I now have some of the dimensions files saved as PDFs now too.
Immediate next steps in this area…
– Research vinyl costs and requirements
– Begin work on side art and other graphics
– Create layout plans of arcade cabinet parts
– Purchase joysticks and buttons (done)
Here’s a list of all the posts about my arcade build.
Part 1
Part 2 – Decisions
Part 3 – Cabinet Design
Part 4 – Control Panel Plans
Part 5 – Initial Questions and Concerns
Part 6 – Online Resources
Part 7 – Cabinet Plans
Part 8 – Buying and Cutting the Wood
Part 9 – Tools and Materials
Part 10 – Building the Cabinet
Part 11 – Building the Control Panel
Part 12 – Sanding and Painting
Part 13 – The Coin Door
Part 14 – Artwork
Part 15 – Printing and Applying the Vinyl
Part 16 – Adding all the T-moulding
Part 17 – The TV Monitor
Part 18 – Making the Bezel
Part 19 – The Marquee
Part 20 – Installing the Electronics
Part 21 – Setting up MAME
Part 22 – Issues to Watch Out For
Part 23 – The Finished Cabinet
Arthur
Sep 5, 2016 -
Hi, Do you know Videoval machines?? I have one but I can’t find any information!!
Retromash
Sep 5, 2016 -
Hi Arthur, I’ve personally never heard of them I’m afraid and when searching on Google there’s a lot of European links on the first page in Croatian, Spanish and Icelandic. Are they multigame cabs or something? Michael
Bjorn Anthoons
Nov 29, 2017 -
Is it possible to post the planns of your cabinet? I do like those angles instead of the curves of the Joust cabinet. I want to make my own Street fighter 2 cabinet based on this model.
Retromash
Nov 29, 2017 -
Hi Bjorn. Sure, I’ll email you the plans that I used.
Leland Beckwith
Jan 25, 2018 -
Could you send them to me too? I want to downsize it greatly and put use it for a raspberry pi based arcade machine.
Retromash
Dec 10, 2018 -
Hi Leland. Apologies if I hadn’t gotten back to you yet. I’ve now updated the blog post with the plans available for download. Check out near the bottom of the blog post above. Cheers.
Maurice
Feb 20, 2018 -
Hi Retromash
Would you be kind enough to email a copy of your plans as well please. This design brings back many memories for me as well.
Retromash
Dec 10, 2018 -
Hi Maurice. Apologies if I hadn’t gotten back to you yet. I’ve now updated the blog post with the plans available for download. Check out near the bottom of the blog post above. Cheers.
Simon
May 17, 2018 -
Hi Retromash,
Excellent amount of information and exactly what I needed to make my first machine.
Can I be cheeky and also ask for the plans to get the templates made, the wood side is the bit I need the help with.
Many thanks
Simon
Retromash
May 21, 2018 -
No problem Simon. I’ll email you now.
Greg
Jul 27, 2018 -
I would also be interested in the full plans you emailed if you do not mind. Thanks in advance.
Retromash
Dec 10, 2018 -
Hi Greg. Apologies if I hadn’t gotten back to you yet. I’ve now updated the blog post with the plans available for download. Check out near the bottom of the blog post above. Cheers.
Ryan
Dec 10, 2018 -
Sorry I know a lot of people are asking you for the plans. Could you email me as well?
Retromash
Dec 10, 2018 -
Hi Ryan. The plans are available for download in the blog post. Check out the download links near the bottom of the blog post above. Cheers.
Ryan Belknap
Dec 11, 2018 -
Thanks for replying back but I am only able to pull the pdf files for the sides of the cabs. Nothing else will pull up.
Retromash
Dec 11, 2018 -
Hi Ryan. I think it mostly is just dimensions of the sides that I have. What else were you expecting? I’ve got the measurements of the other bits of wood that go between the sides in this other post in my blog series https://retromash.com/2016/05/02/building-a-home-arcade-machine-part-8-buying-and-cutting-the-wood/
Billy Lilly
Aug 28, 2018 -
Great choice! I agree that the Joust cab is about as classic of a look as it gets! Would u mind sending me the plans too? I’m a folk artist, so my cabs will be a little less conventional but it would be wonderful to start out with something straight forward and abstract from there.
Billy Lilly
Aug 28, 2018 -
I see that you’ve already posted them here. Thanks!
Retromash
Sep 2, 2018 -
Hi Billy. I didn’t think I actually had posted the plans here already. Had I? I have now though as I have just added the link to the download files near the end of the blog post above. Cheers.
Bjorn Harris
Apr 3, 2018 -
Hi retromash
What amazing level of detail you have shared. Awesome.
Would you also be able to share the designs with me?
Cheers
BJ
Retromash
Nov 12, 2018 -
Hi Bjorn, Thanks a lot for your comments. Apologies if I missed your comment when you first posted it. I have now uploaded the designs and the link is in the post above. Cheers. Michael
David Liggins
Apr 8, 2018 -
Hi, I have been planning on making a retropi arcade machine and been struggling to find a cabinet design.
The one you have here looks perfect. Would you be kind enough to email me the design?
Many thanks
David
Retromash
Nov 12, 2018 -
Hi David, Thanks a lot for your comments. Apologies if I missed your comment when you first posted it. I have now uploaded the designs and the link is in the post above. Cheers. Michael
John P
Jun 8, 2018 -
Hello, Could I also have the plans you used e-mailed to me please?
Retromash
Nov 12, 2018 -
Hi John, Apologies if I missed your comment when you first posted it. I have now uploaded the designs and the link is in the post above. Cheers. Michael
Douglas C
Jul 24, 2018 -
Hi. Just came across your website and would love a copy of your plans if you have the time. Planning on starting this project within the next month.
Retromash
Nov 12, 2018 -
Hi Douglas, Apologies if I missed your comment when you first posted it. I have now uploaded the designs and the link is in the post above. Cheers. Michael
David Johnson
Jul 24, 2018 -
I would love to get a copy of the plans that you used as well. I have my retropi built and running and built an arcade stick. Everything went great and is working well. Now, I want to build a full size cabinet.
Thanks
Retromash
Nov 12, 2018 -
Hi David, Thanks a lot for your comments. Apologies if I missed your comment when you first posted it. I have now uploaded the designs and the link is in the post above. Cheers. Michael
Colin F
Nov 11, 2018 -
Hi Michael,
I’ve been reading through your blog. Great job.
I’ve just got some MDF back from B+Q o start my own.
Please could you e-mail dimensions in pdf?
I’ve downloaded the zip, but I don’t have Adobe Illustrator
Thanks in advance
Colin
Retromash
Nov 12, 2018 -
Hi Colin. Thanks a lot for your comments. I have now uploaded some PDFs in the blog post above, next to my other download link. Hopefully those help. Good luck with the build! Cheers.
Grant
Nov 29, 2018 -
Hi Retromash,
Great post, I’m going start making my own now. I’m using a Raspberry pi, with an old 32 inch screen. I was going make it so it plays the retro games, can use it as a pc, and play movies and that on it for my gf kids…it’ll sit a little lower and have a bench attached…and advice on does and don’ts with what I plan to do?
Retromash
Dec 10, 2018 -
Hi Grant. Sorry for the late reply. No real specific advice I’m afraid as every build is so unique. But you can read my blog post on ‘issues to watch out for’ https://retromash.com/2016/05/31/building-a-home-arcade-machine-part-22-issues-to-watch-out-for/
Main bits of advice would be 1) Plan as much as you can up front so that you don’t hit big hurdles halfway into it and have to un-build bits of it, and 2) Have fun! I enjoyed the build almost as much as I enjoy playing it now. Hope it goes well for you mate.
Petru Noir
Apr 22, 2019 -
Awesome job, would you share the plans?
Thanks
Retromash
Apr 23, 2019 -
Hi. Thanks a lot. The plans are already available to download in the blog post above.
rhcp
Nov 4, 2019 -
Cool project ! I have studied in depth , very well documented, using a crt monitor .. oldschool awesomenes .. i have downloaded the drawings (sketchup and all) but didn’t see the skp/cut diagram for your particular cabinet (the one’s showing on youtube video)
I also want to use an old tv and i could realy use the plans for making the cabinet.Regards!
Top 10 Sci-Fi Items in Old Movies That You Would Like to Have | Retromash
Nov 17, 2022 -
[…] to be able to make multiple weapons, gadgets and computer devices. I’m sure he could even build his own arcade machine if he put his mind to […]