My last post highlighted my questions and concerns. I won’t really be doing that any more in these posts in a ‘live’ way because I had to put the blog post writing on hiatus while I actually focussed on getting the arcade machine built in time for my 40th birthday party. So all the posts from now on are written in the past tense after the machine has mostly been built. I’ll still try to highlight any problems that I had along the way though and mention how I tackled them.
Probably the biggest part of the whole process of building my first cabinet was the cabinet plans. In the previous post about Cabinet Designs you saw that I picked the Joust and Moon Patrol cabs as my main inspiration. I had found an image of a Sketchup file that someone had made of a Joust cabinet. I got hold of the Sketchup 3D file and had a look at it but as someone else had made it I couldn’t really get my head around it. I knew I had to build my own plans myself.
I wanted something fairly tangible during the planning process, as opposed to just sketches on paper, because I knew I had to work some measurements out as I went along. Not all the angles, lengths and structures were obvious to me just in my head.
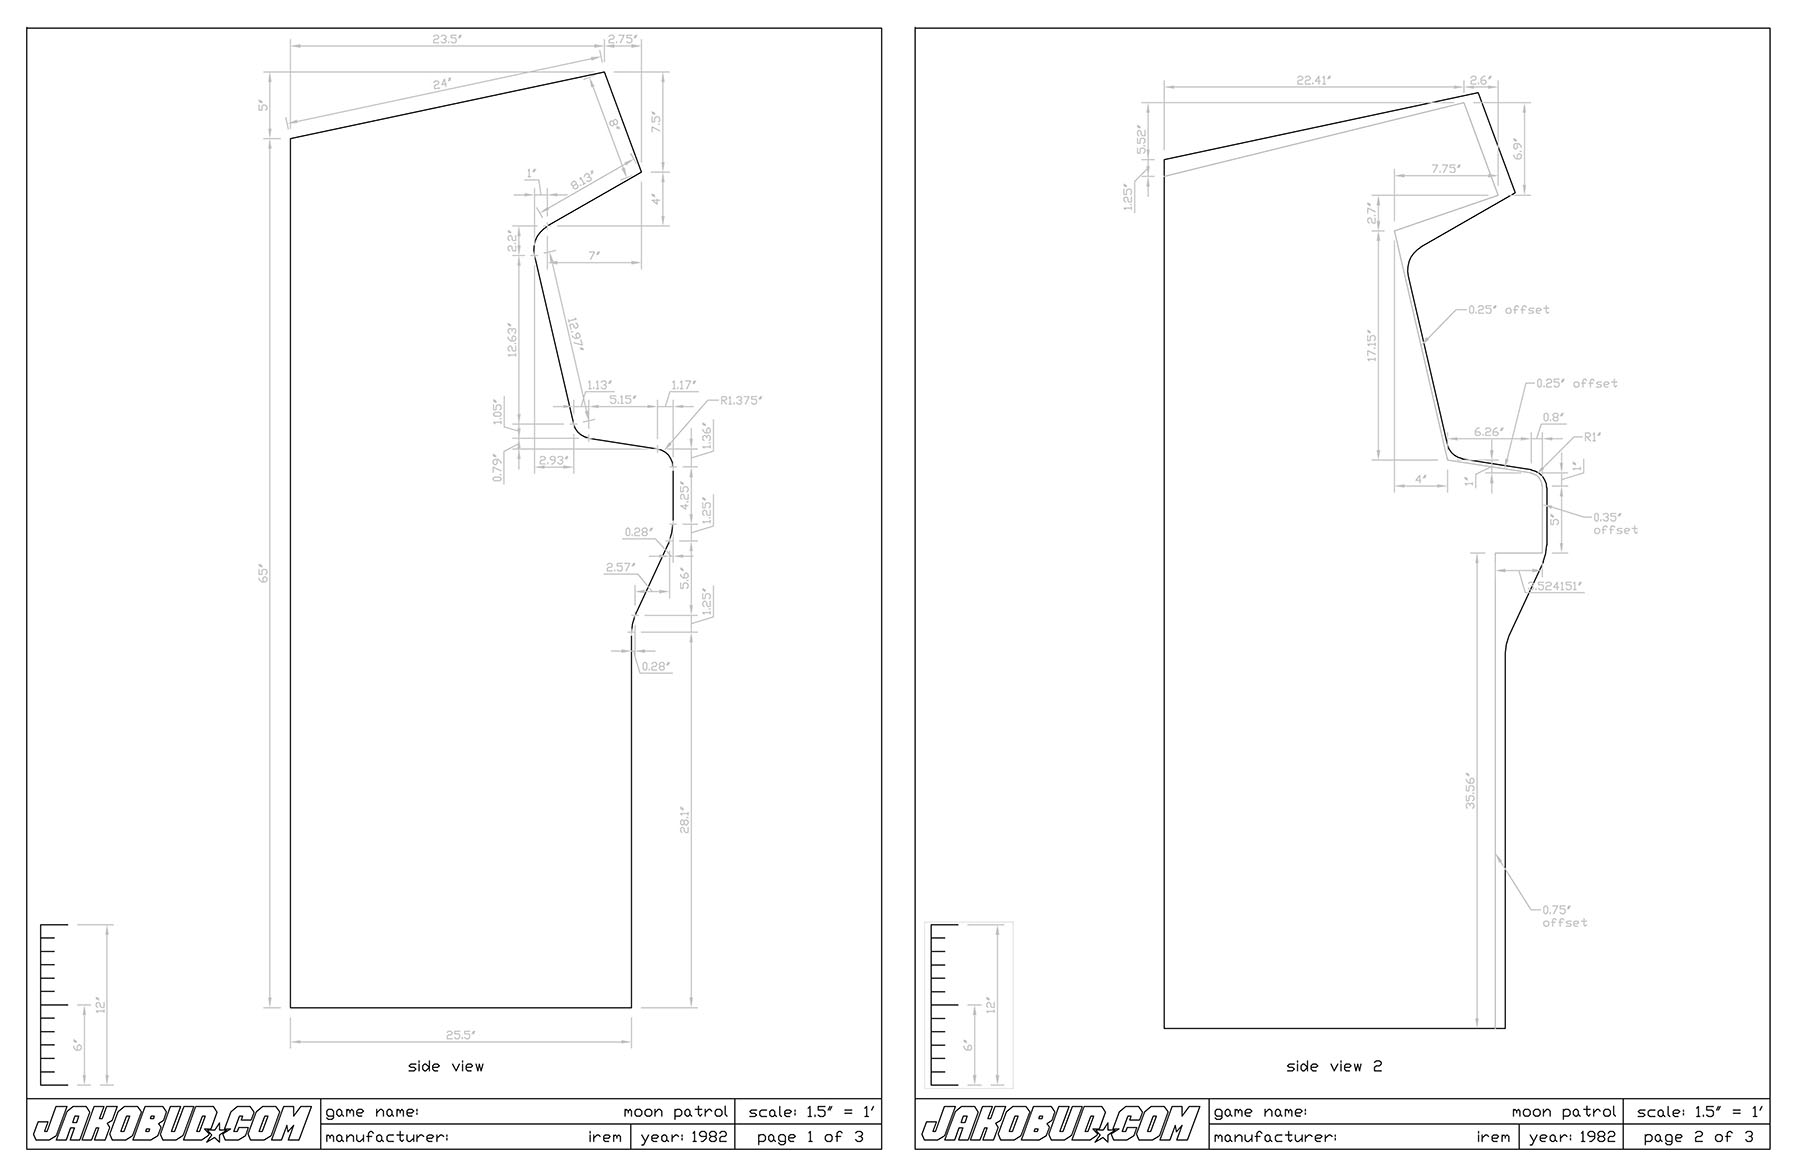
First of all I had to get the basic measurements of the cabinet. As I mentioned previously I was hoping to visit Arcade Club UK and measure a real Joust cabinet and then use those basic measurements along with the silhouette image that I had and work out all the dimensions that I needed. But I didn’t get to go to Arcade Club in the end. I then tried to get someone to measure the height of the Joust cabinet at Arcade Club UK for me. But that didn’t manage to happen either. Then I spent ages trying harder to find Joust plans somewhere online and eventually I found them on the Jakobud website. These plans were exactly what I needed. They were actually Moon Patrol plans but they’re the same as Joust as far as I know. I think the two machines just have 2 inches difference in their width. And I made my machine to my own width specifications anyway. See the images below.
It was slightly annoyingly it was right facing and for some reason my brain wants to work left facing, and it’s hard to flip the image when it has all the numbers on it, so I just kept working on it right facing. But also I like to work in mm and this was all in inches. I’m fussy I know, but I just knew I had to get it into a form that I knew I could work with easily to make my life a bit easier. So for a while I was constantly converting things from inches to mm and back again to check and double check all my measurements.
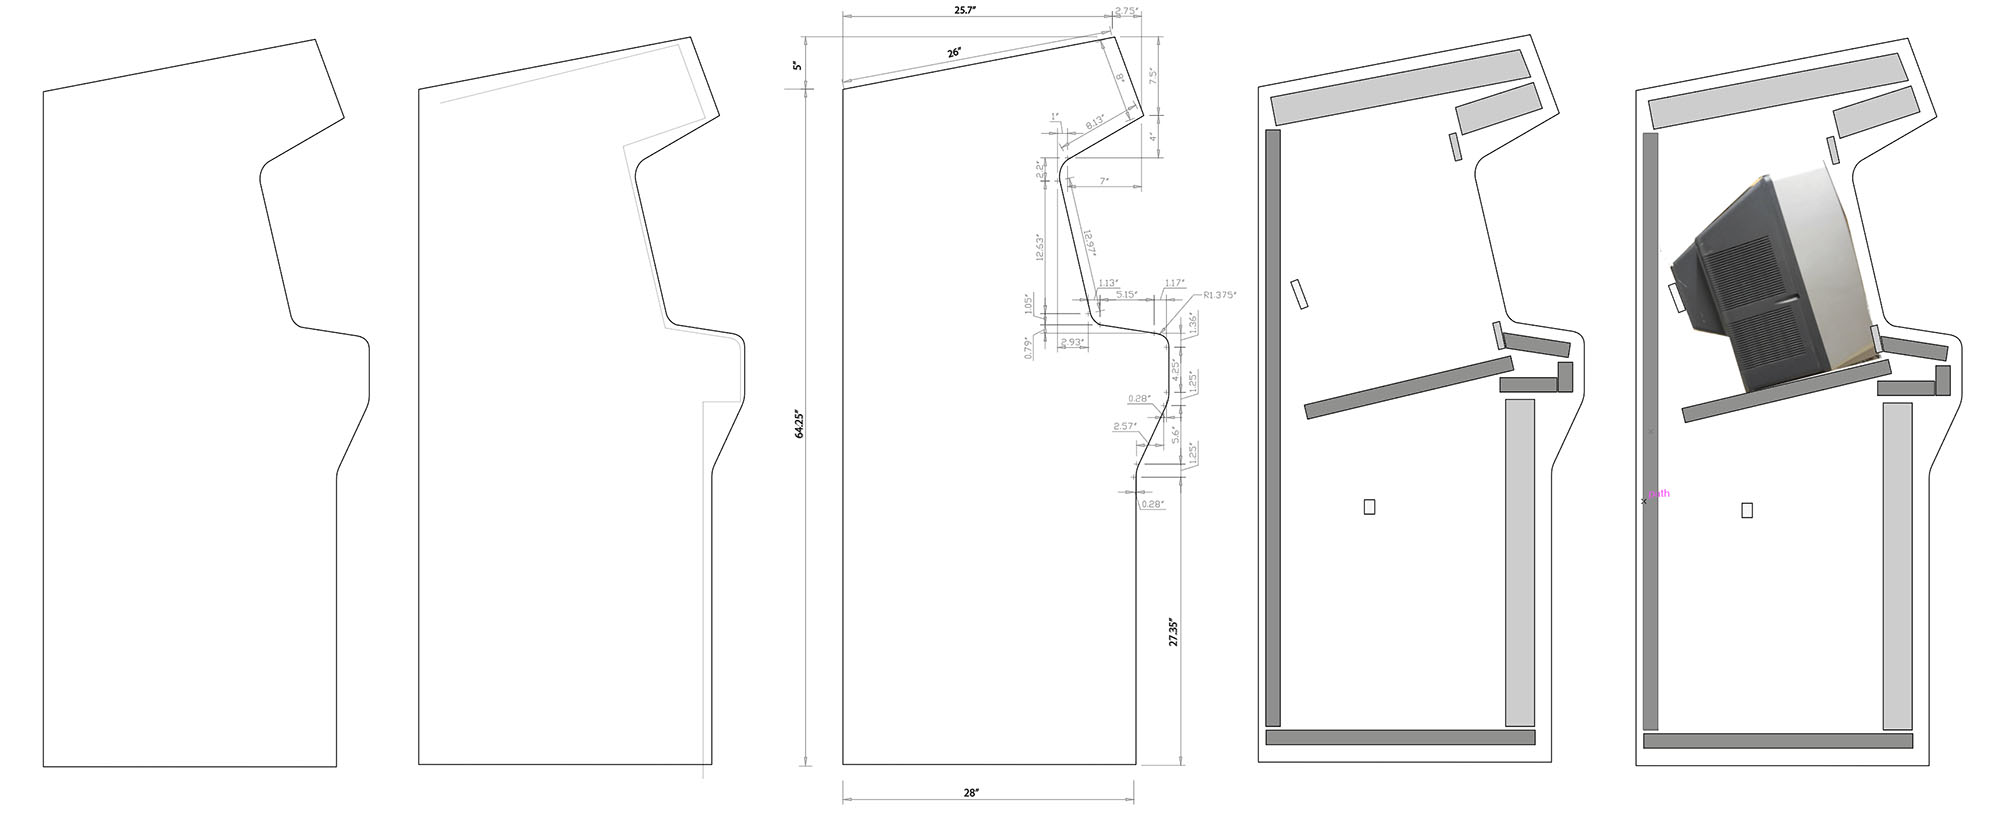
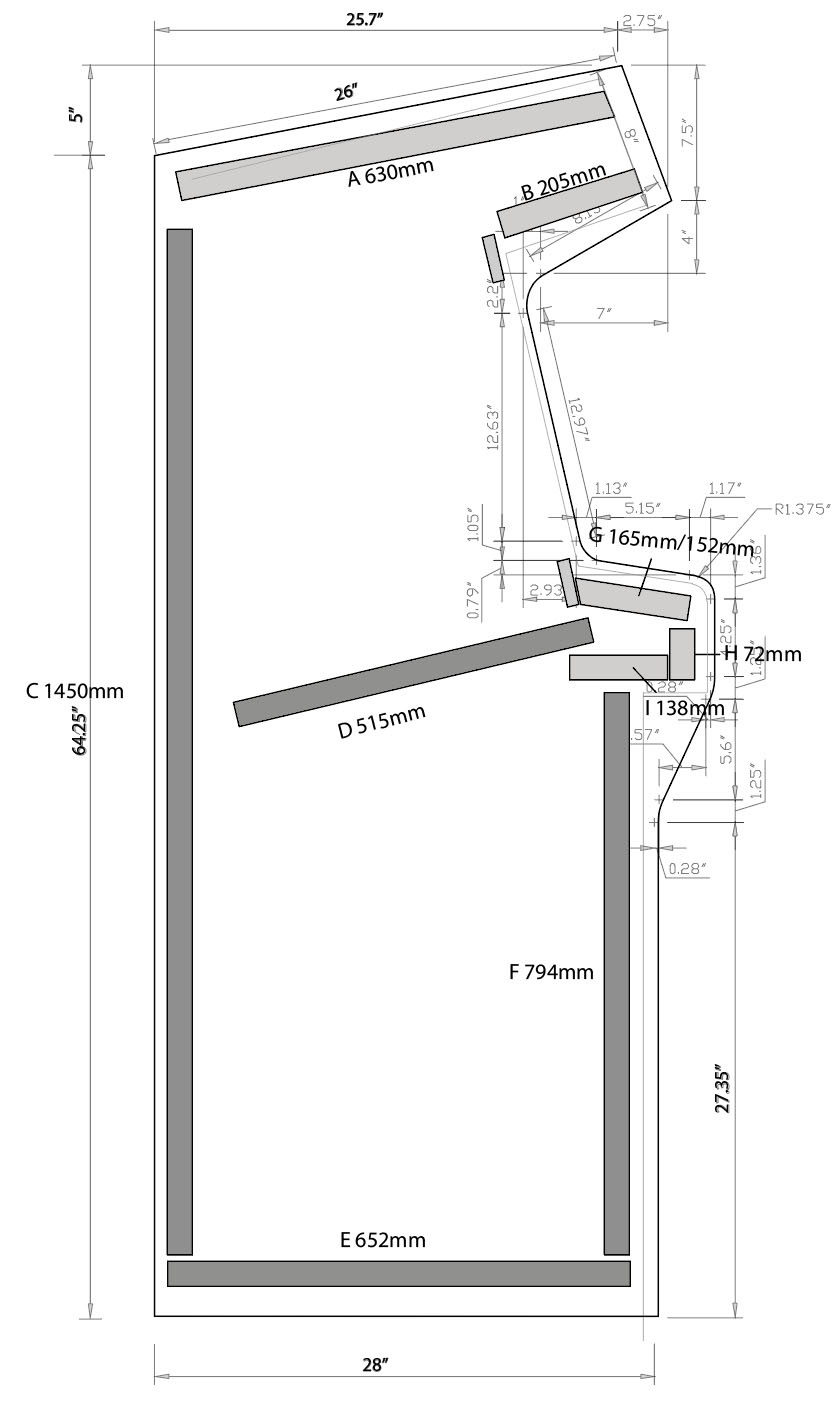
I also had to work out a few measurements that were not on that document. Things like measuring how large the space was for the TV, because the Joust and Moon Patrol cabinets would have had arcade monitors which aren’t as bulky as a TV in a case. So I managed to scale up the whole vector image so that it was a true scale diagram and if I drew a line tool within Adobe Illustrator I could measure exactly how long a measurement was in real life. When I drew a line from left to right it would say it was 710mm, or whatever it was. This became priceless as I measured out all the little angles and lengths that I needed for the adjustments that I wanted to make. You can see a pic below of various stages of diagrams that I used to help me, including one where I added in all the batons that I knew I would need, and also a scale photo of the TV that I had taken in order to put it in context to check that it would fit too.
Another adjustment I had to make was because I wanted to add castors to the bottom. I didn’t personally like the idea of having castors but I heard it was invaluable later on if you had to move it. I wasn’t planning on moving it too much but I thought I would add them anyway, and in retrospect I’m so glad that I did. But I didn’t want to add too much height to the cabinet, so what I did was lift the base up a few cm, up the inside of the cabinet, and have the castors just sticking out under the bottom of the sides by about 2cm to give it enough clearance to handle bumps or carpet but not look too obviously ‘on wheels’ when people look at it.
While we’re talking about castors, I got industrial strength ones and chose to get two stationary ones and two swivel ones. I put the stationary ones at the front so that it would minimise wobble when playing the games. This does make it slightly harder to manoeuvre but stability is definitely the priority. It still is slightly wobbly when you play games like Street Fighter but that’s the price you pay for ease of mobility. I’m pretty happy with the compromise.
But I’m getting ahead of myself. I really knew that the secret to me building a good cabinet, while not having much experience of building things, would be in the planning. I had this scale vector diagram in Illustrator which was great, but I needed something more tangible in 3D. I first of all tried to make a scale model in cardboard but it wasn’t really working and it was hard to adjust things or make it stand up properly. So I moved onto Google Sketchup and started learning how to use that. It’s a great app for quickly prototyping ideas and having a look around them. I managed to build the arcade in various layers so that I could see how it would look at various stages of the build and see how things would fit together. I was actually able to take measurements from the Sketchup file in order to check that things like my TV would fit ok. This tool really was invaluable to my process. And it’s free! See the video below of my model.
Once I had effectively built the cabinet in Sketchup, and had the scale measurements in Illustrator I felt ready to move on to the actual physical build.
Here’s a list of all the posts about my arcade build.
Part 1
Part 2 – Decisions
Part 3 – Cabinet Design
Part 4 – Control Panel Plans
Part 5 – Initial Questions and Concerns
Part 6 – Online Resources
Part 7 – Cabinet Plans
Part 8 – Buying and Cutting the Wood
Part 9 – Tools and Materials
Part 10 – Building the Cabinet
Part 11 – Building the Control Panel
Part 12 – Sanding and Painting
Part 13 – The Coin Door
Part 14 – Artwork
Part 15 – Printing and Applying the Vinyl
Part 16 – Adding all the T-moulding
Part 17 – The TV Monitor
Part 18 – Making the Bezel
Part 19 – The Marquee
Part 20 – Installing the Electronics
Part 21 – Setting up MAME
Part 22 – Issues to Watch Out For
Part 23 – The Finished Cabinet


Mark Johnson
Sep 10, 2017 -
Nice write-up. Love the detail. I’ve been surfing to put together plans for my own cabinet, and this was about the best source of information I’ve found. Thank you!
I’ve got a few questions regarding your build. You didn’t mention how wide you made your cabinet. I’ve been stressing on this point. I’d like to fit 2 players comfortably, but I don’t like the look of the control board extending wider than the panels.
It looks like your control board sits a bit closer to flush with the sides. How close to flush were you shooting for? I was thinking that for 2 players if I don’t want to have the control board larger than the cabinet width and I don’t want something too large, I’d like to go near flush.
I also like the look of your control board with fewer buttons since you moved them to the front—but I’m worried about people bumping into the buttons on front. Has that been an issue?
I was also looking at adding a retractable base. My favorite is something I found when I was trying to make shop equipment more mobile, which is remarkably simple (http://CarlHolmgrenWoodworking.com). How do you find the machine on non-retractable wheels? Do you find it moving around on you?
Again, thanks for your webpages!
Retromash
Sep 11, 2017 -
Hi Mark,
Thanks very much for your comments. I love when I hear that people have benefitted from these blog posts. It makes the effort worthwhile.
I was basing my design on Joust and Moon Patrol. I can’t remember now but I think Joust was 26” wide and Moon Patrol was 24.5” wide, or perhaps the other way around. I basically finalised my decision on the width based on the TV that I had. You’ll see from this post https://retromash.com/2016/05/02/building-a-home-arcade-machine-part-8-buying-and-cutting-the-wood/ that the MDF panels are 624mm wide. And I think each bit of MDF is 18mm thick. The control panel sits between the two MDF side panels so the overall width is 18+624+18=660. This equates to 26 inches.
I was going for the control panel to be flush between the side panels. It hinges at the bottom, so I can tip it down to access the wires, but I wasn’t sure exactly how I would fix it down whilst playing. But to be honest it was so perfectly snug when I attached it down that it just stays in due to friction. I was pretty lucky there. Although to be honest, the vinyl sticker on the control panel had to wrap round the sides of the control panel edges and that added another 0.5-1mm which almost makes it too snug, and it slightly ruffled the vinyl sticker on one side of the control panel when I first slotted it back in. But it’s not too bad.
Regarding the buttons on the front, it’s not really a problem if people knock the Player 1 and 2 buttons but the yellow button is ‘Exit’ on one version of MAME and my son has occasionally knocked that whilst playing some games. I’ve never done it myself though. But I’m sure I could remap that within MAME if it became an issue. I hid the Insert Coin button and also another spare button underneath the control panel so I could always use that spare button for ‘Exit’ if I wanted.
A retractable base certainly sounds interesting. I just went for wheels in the end. I’m very glad I did, because I have had to move it several times, and I also had to originally move it forward and backward each time I played it so that I could reach down to the plug behind it and switch it on! I now use a voice controlled Smart Plug with the Alexa app, so I don’t have to reach down any more. But I would use smaller wheels next time, because I thought I might have it on carpet, but it’s actually on wooden floorboards, and the excess height off the ground does it make it feel slightly wobbly when you have two people playing something physical like Street Fighter 2. But the actual machine doesn’t move around on the floor, no, as the MDF and CRT TV are too heavy for that.
Hope that all helps. Good luck with your build!
Michael
Bjorn Anthoons
Mar 5, 2018 -
I’m 1.70 tall and I want to know of the angle of the screen is at the correct height without getting pain in the neck or back.
Retromash
Mar 5, 2018 -
Hi Bjorn. Thanks for your message. I’m absolutely not qualified to give any medical advice, but I can tell you that I am 5 feet 11 inches tall and it is fine for me. It’s a standard Joust or Moon Patrol cabinet, so I’m sure it is fine for all heights. Cheers.
Luiz Eduardo
Jul 12, 2018 -
Nice Job! I had this in my favorites for more than a year and I’m trying to start a project to build a Joust machine. Can you share the sketchup model file? Thank you and congratulations once again!
Cody
Nov 28, 2018 -
I have found your information on this build to be an invaluable resource and I will soon begin building a cabinet myself. One thing I cannot find is the Sketchup file for the cabinet you designed. Do you still have it? I found the ones for the Joust cabinet.
Eli
Dec 18, 2018 -
Hi Michael
just wanted to say thank you for people like you who shares their awesome projects and giving the best advice anyone can ever receive. I also would like to ask you if you could share your Sketchup files of your cabinet, this would save tons of time and work. Surly when can send these to the carpentry shop. Thumbs up and thank you very much
Retromash
Dec 18, 2018 -
Hi Eli. Thank you very much indeed for your kind comments. Much appreciated. The Sketchup files are available for download in this post https://retromash.com/2016/02/09/building-a-home-arcade-machine-part-3-cabinet-design/ Good luck! Michael
Jeremy
Feb 25, 2019 -
This is perfect write up. I’m at design stage and your blog has helped more than every source combined! Thanks so much and great work!
Retromash
Feb 26, 2019 -
Thanks Jeremy! Getting comments like that and knowing it’s helped someone really does make it all worthwhile. Thanks a lot for the taking the time to leave a comment. Good luck with your build and please do send photos once it’s built! I’d love to see the finished piece.
Brad
Nov 4, 2020 -
Awesome work on this. I’ve got a cnc, along with a bunch of nice german woodworking powertools, and i’m using this for reference for my design. (fun fact: joust was one of the first games for my nintendo i got for Christmas as a kid) follow me on instagram @neon___dreamz to keep up with what i’m working on. :D
Retromash
Nov 5, 2020 -
Nice. Good luck with the build, Brad!